Background
One of the things organizations typically gain when moving into cloud, is visibility. Especially, when you’re using a single vendor (such as Microsoft), you can get very wide visibility into the organizations cloud infrastructure, assuming you have the privileges required (and you know how to navigate 10 different portals). For security professionals this is typically positive, because you can see what’s happening and how things have been configured. But it can have a negative impact as well, especially when thinking of privacy.
In this blog, I’ll have a brief look at one specific use case, that is related to the issue of visibility and how it impacts privacy.
The use case is this:
Certain people (e.g., SOC analysts) need to be able to see certain information about all emails being sent and received. This information includes:
- Sender email address
- Recipient email address
- Subject of the email
- Time (when it was sent)
- Verdict(s) from the security solutions being used (did the email contain malware, attachments, URLs, etc.)
The problem is, that this information can be very sensitive. Even when you’re not able to view the contents of an email, being able to see sender, recipient and email subject means that this can be subject to very strict data privacy regulations. The question is:
- Do you know who has access to this information?
- Are you able to track who has accessed this information?
In an on-premise environment, this would normally not be a problem. Typically, only very limited people have access to email infrastructure, such as Exchange servers or 3rd party mail gateways. In the cloud, however, this may not be the case. If you’re using Exchange Online (and Defender for Office 365), you have different ways of accessing this information. You also have a fairly complex permissions structure (Entra ID roles, Exchange Online role groups, Defender XDR unified RBAC, etc.) that determines who can access the information. Then you have various audit and activity logs, but do you know which actions are actually being logged?
Accessing email message trace
Overview
My goal here is to do a simple test, as follows:
- Create an account with Global Reader role in Entra ID. The reason for using this role is that in my experience it is quite widely being used in organizations, but it’s not necessarily being identified as being a very sensitive role, because it cannot make any changes to the environment.
- Note: I verified the tests also with an account with Security Reader role, which is a role with much more limited permissions. While Security Reader cannot access some of the views in the Defender XDR portal, the overall result is the same, as noted in the conclusion section.
- Note: I verified the tests also with an account with Security Reader role, which is a role with much more limited permissions. While Security Reader cannot access some of the views in the Defender XDR portal, the overall result is the same, as noted in the conclusion section.
- Verify, if the account can access the information described in the use case (sender, recipient, subject, etc.) and try to access the information via different portals.
- I used the Defender XDR portal (https://security.microsoft.com) and Exchange Admin Center (https://admin.exchange.microsoft.com), but there might be other ways available as well.
- I used the Defender XDR portal (https://security.microsoft.com) and Exchange Admin Center (https://admin.exchange.microsoft.com), but there might be other ways available as well.
- Verify (with an admin account) what kind of audit trail is left behind in the following logs:
- Activity log of Defender for Cloud Apps (in Defender XDR portal)
- CloudAppEvents table in Defender XDR advanced hunting
- Microsoft 365 audit log (in Microsoft Purview portal or Defender XDR portal)
Access email message trace via Defender XDR (Explorer)
Let’s start from the Defender XDR portal, under Email & collaboration. Global Reader can access more or less everything here (regardless of whether Defender XDR Unified RBAC has been implemented or not).

Now, let’s open Threat Explorer (Explorer in the navigation). Among other things, we can see the following information from all of the email processed by Exchange Online and Defender for Office 365:
- Sender address (and domain)
- Recipient address
- Subject
- Time
- Delivery location
- Threat type
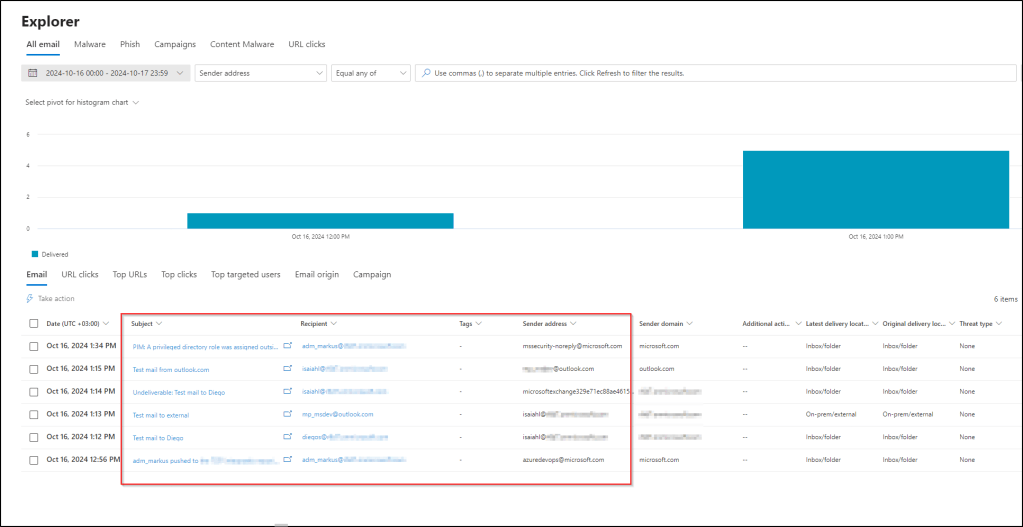
By default, the view shows emails from the last two days (since the beginning of the day before). However, you can change the filter to search emails from further back.
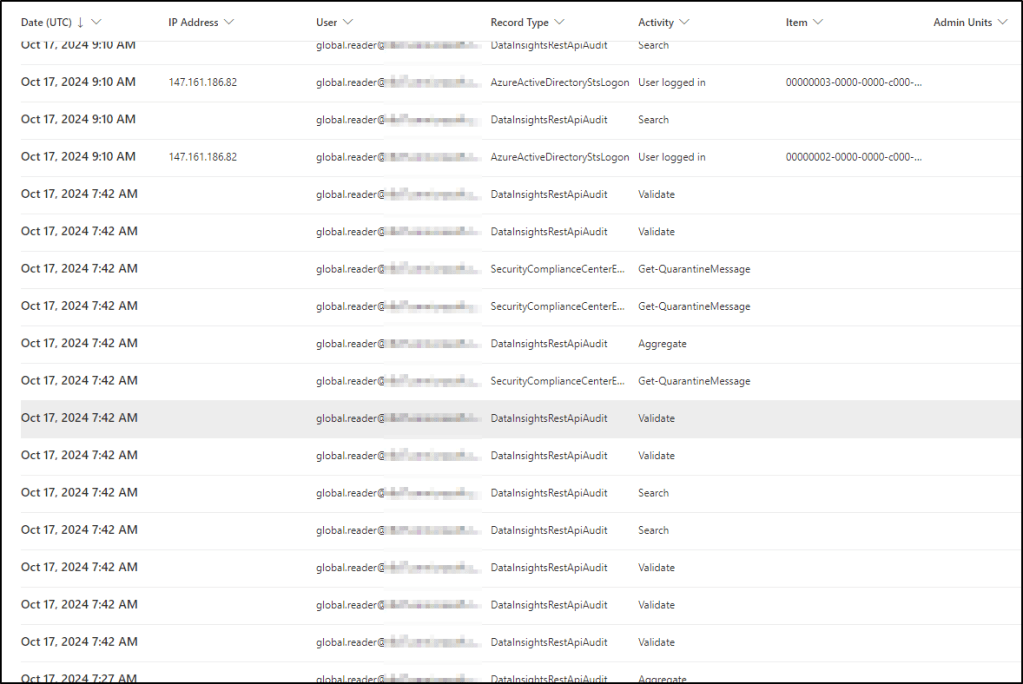
Is there an audit trail for opening this view? Yes and no – the logs show a bunch of activities, most of which are related to RBAC. One of the log entries shows that the user opened the ThreatInstanceList, which relates to opening the Threat Explorer. However, it doesn’t give any information about what the user saw, i.e. what the filter was. So you cannot really determine, whether the user searched for emails for the last two days, or the last two weeks. Not very useful.
Now, let’s click one of the emails, which opens a more detailed view of an email.

Is there an audit trail for opening this view? Yes – in this case, the logs show that the user opened the specific email (the message ID is logged).

Access email message trace via Defender XDR (Advanced hunting)
Next, let’s look at Advanced Hunting. In the EmailEvents table, we can see all the information that we’re interested in right now (sender, recipient, subject, etc.).

Is there an audit trail for opening this view? No – I could not find any log entries of the query being made.
Access email message trace via Exchange Admin Center
Finally, let’s have a look at Exchange admin center (https://admin.exchange.microsoft.com) and go to Mail flow > Message trace. This allows us to query message trace logs, which contain the information that we are now interested in.
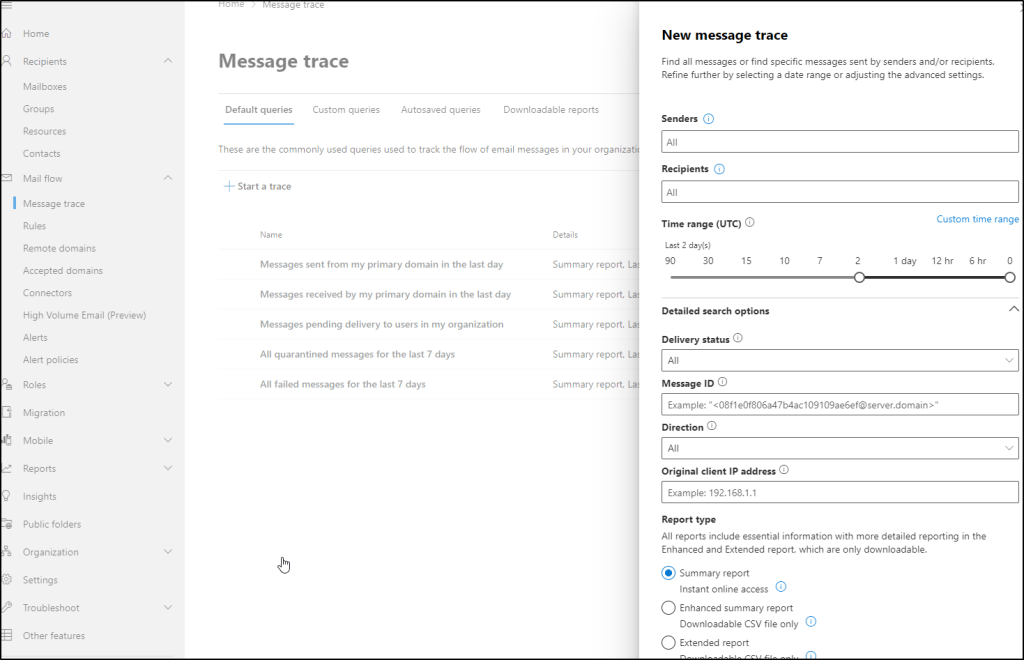
Let’s start a new message trace, and the results show again the same list of emails that we’ve seen before. Again, this is already sensitive information, because we can see the sender, recipient and subject of the emails.

Is there an audit trail for opening this view? No – using the message trace is not being logged. This is actually stated quite clearly also in the documentation (the message trace can be accessed also via Get-MessageTrace commandlet):

If we open one of the emails in the message trace, it will show us more information about the email delivery of that specific email.
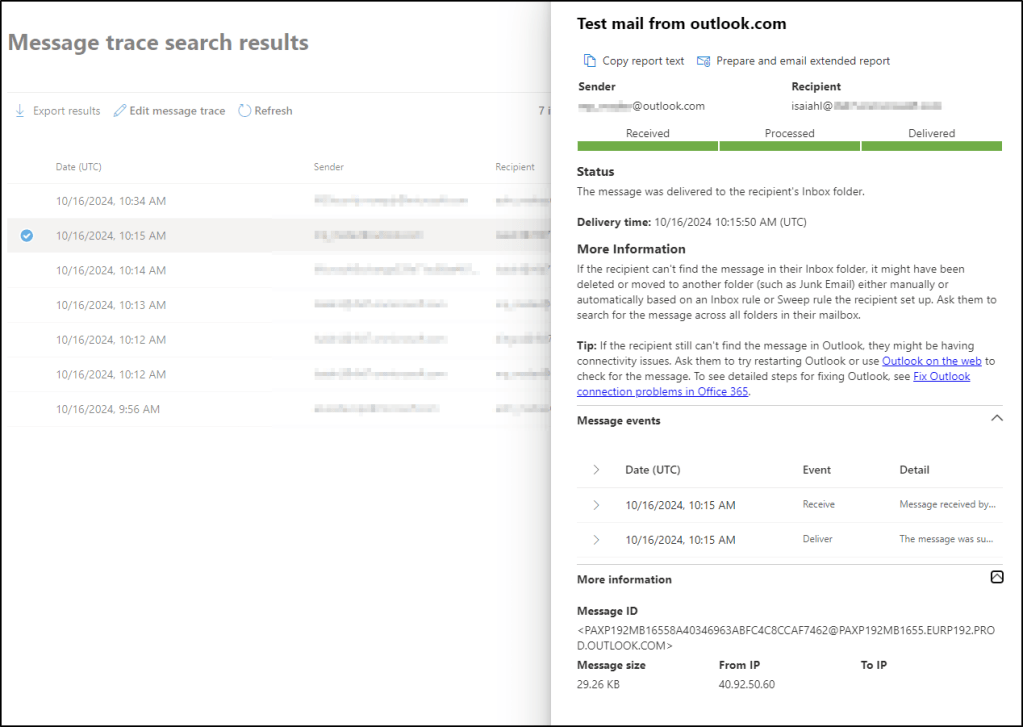
Is there an audit trail for opening this view? No – I cannot see any log entries from opening the email, which is expected as the creating the message trace itself is not being logged.
Analyzing the logs
For each of the tests above, I’ve noted whether I was able to find anything from the audit logs or not. A few words about the logs themselves:
Defender for Cloud Apps (MDA) has a very useful Activity log feature (accessible via the Defender XDR portal), which consolidates logs from all connected sources. While the UI can be a bit slow sometimes, it is intuitive to use, and works well when there is not too much data.
In this case, the activity log contains a lot of entries for the test period. However, there is not a lot of information here, and you need to individually dig into the raw data to actually see some details.

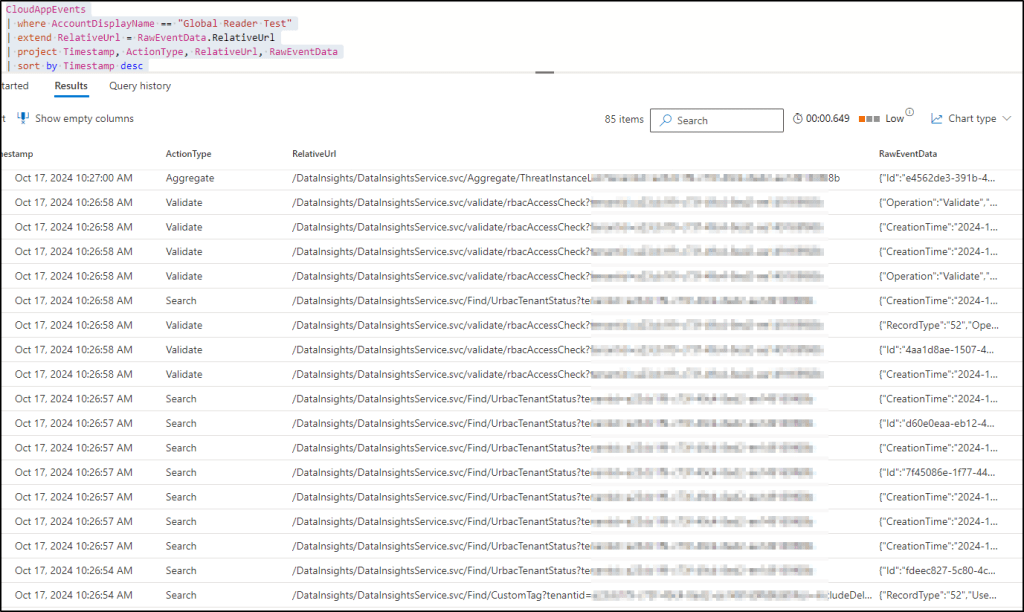
Therefore, a better way is to use advanced hunting and the CloudAppEvents table, which I used for most of the analysis:

You can also use the Microsoft 365 audit log, which can be accessed either through the Defender XDR portal or through Microsoft Purview portal. The audit log search is a bit cumbersome, and when doing cross-checking I did not find any additional information in the audit log that wouldn’t be available in the CloudAppEvents table. This makes sense of course, because Defender for Cloud Apps pulls audit logs from Microsoft 365.
Finally, you can send the Microsoft 365 audit logs and/or the CloudAppEvents into Microsoft Sentinel and query the same information there. Because Sentinel runs on top of Log Analytics, you can actually audit all the queries being made there. However, that’s not what I wanted to test here (Sentinel also uses Azure RBAC permission model, and not Entra ID roles).
Conclusion
Overall, the audit logs are very limited when it comes to querying email message traces:
- Queries made to the Exchange Online message trace through Exchange Admin Center are not being logged, even though the unified audit log ingestion has been enabled in Exchange Online.
- Advanced hunting queries are not being logged, and you can see the message trace in the EmailEvents table (of course, you can a lot of other potentially sensitive information as well, such as device and network events from Defender for Endpoint).
- Accessing the overview page the the Defender XDR threat explorer shows the email trace. While opening the page is being logged, it’s not clear what the user saw there. However, opening an individual email is being logged with the message ID.
Some final recommendations:
- Global Reader has very wide read access (as its name suggests), but even Security Reader can use advanced hunting queries and access the Exchange message trace by default. Be mindful of this when assigning these roles.
- Implement Defender XDR Unified RBAC, which allows more granular control of the permissions in Defender XDR. However, note that even after activation, users with the Entra ID roles will still have access to the data (you have to replace the Entra ID roles with the Defender XDR Unified RBAC roles).